

Introduction
Table of Contents
Let’s face it—desserts are the real MVPs of any gathering. Whether it’s a casual barbecue, a holiday party, or even a cozy night at home, there’s nothing better than ending things on a sweet note. But, you know what’s even better? Desserts that come in their own little cups! No slicing, no sharing, no mess—just pure dessert bliss in a perfectly portioned serving.
Dessert cups are a total game-changer. They’re easy to make, look fancy enough to impress, and they’re endlessly customizable. From rich chocolate mousse to fruity parfaits, there’s something for every craving and occasion. Plus, they’re so darn cute, they’ll steal the show on any dessert table.
So, grab your spoons and get ready to whip up some sweet magic! In this post, I’ll share some of my favorite dessert cup recipes that are simple, delicious, and guaranteed to make you the hero of dessert time. Ready? Let’s get into it!
Why Dessert Cups Are a Game-Changer
Perfect for Any Occasion
Let’s be real—dessert cups fit into every situation effortlessly. Hosting a dinner party? Dessert cups add a touch of elegance. Throwing a casual barbecue? They’re easy to serve and grab. Even if it’s just a weeknight treat, dessert cups feel like a little celebration in themselves. Plus, there’s no need to worry about slicing or portioning—each person gets their own perfectly sized serving. It’s convenience at its finest.
Customizable for Every Craving
One of the best things about dessert cups is how versatile they are. You can go rich and indulgent with chocolate mousse or keep it light and refreshing with a fruit parfait. Want to go seasonal? Try pumpkin pie cups in the fall or peach cobbler cups in the summer. The options are endless, and you can tweak recipes to suit your taste or dietary needs. Honestly, they’re like the chameleons of the dessert world.
Make-Ahead Magic
Here’s a little secret: dessert cups are a busy host’s best friend. Most recipes can be prepped hours—or even days—in advance. That means no last-minute scrambling in the kitchen while your guests are arriving. Just store them in the fridge, and when it’s showtime, all you have to do is bring them out. It’s dessert made easy, and let’s face it, we could all use a little less stress.
Cute and Crowd-Pleasing
Let’s not ignore the obvious—they’re ridiculously cute. There’s something about desserts served in little cups or jars that feels extra special. And they’re always a crowd-pleaser. Whether it’s kids at a birthday party or adults at a wedding reception, dessert cups have universal appeal. Plus, they’re Instagram-worthy, which is always a bonus, right?
With all these perks, dessert cups are hands-down one of the easiest ways to level up your dessert game. They’re practical, pretty, and packed with flavor—what’s not to love?
Essential Ingredients for Dessert Cups
Pantry Staples You Probably Already Have
The beauty of dessert cups is that you don’t need anything fancy to make them taste amazing. Most of the ingredients are things you probably already have sitting in your pantry or fridge. Here are a few staples that come in handy:

- Whipped Cream: The fluffy magic that makes every dessert cup feel indulgent. You can whip it fresh or grab the store-bought kind for convenience.
- Crushed Cookies or Graham Crackers: These make the perfect base layer or topping for that extra crunch.
- Chocolate: Whether it’s melted, shaved, or in chips, chocolate is a must for any dessert lover.
- Fresh Fruit: Strawberries, blueberries, or even sliced bananas can add a pop of flavor and freshness.
- Sugar and Vanilla Extract: These two staples are the backbone of most dessert recipes, adding just the right amount of sweetness and aroma.
Special Ingredients for Fancy Touches
If you want to take your dessert cups up a notch, consider adding a few special ingredients. They’re not everyday items, but they’ll make your creations look (and taste) next-level:
- Mascarpone Cheese: Perfect for creamy, rich recipes like tiramisu or cheesecake cups.
- Matcha Powder: For a trendy, slightly earthy twist—ideal for matcha mousse cups.
- Caramel Sauce or Dulce de Leche: A drizzle of this stuff can transform even the simplest dessert into a masterpiece.
- Edible Gold Flakes or Sprinkles: If you’re feeling extra fancy, these add instant glam to any dessert.
- Flavored Syrups: Think coffee syrups or berry reductions for an added layer of flavor.
Pro Tip: Don’t Forget the Containers
The cups themselves play a big role in presentation, so it’s worth investing in some cute options. Here are a few ideas:
- Mini Plastic Cups: Affordable and perfect for parties. They’re disposable, so cleanup is a breeze.
- Mason Jars: These reusable jars are trendy, sturdy, and great for layering desserts.
- Small Glass Bowls: Ideal for showing off the beautiful layers in your dessert cups.
- Shot Glasses: Perfect for bite-sized, guilt-free portions.
With the right mix of basics and a few fancy touches, you’ll have everything you need to create show-stopping dessert cups. Plus, keeping these essentials on hand means you’re always ready to whip up a sweet treat in no time!
Easy-to-Make Dessert Cup Recipes
Classic Chocolate Mousse Cups
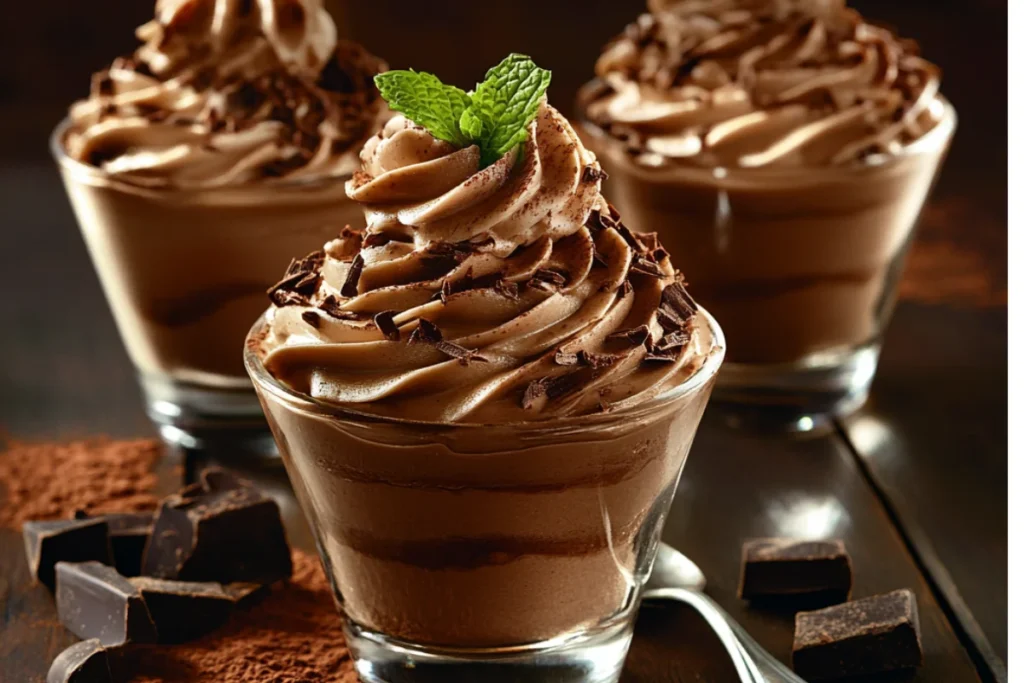
Rich, fluffy, and every chocoholic’s dream, these mousse cups are an absolute showstopper.
- Ingredients You’ll Need: Heavy cream, dark chocolate, sugar, and vanilla extract.
- How to Make It:
- Melt the dark chocolate and let it cool slightly.
- Whip the heavy cream with sugar and vanilla until soft peaks form.
- Fold the melted chocolate into the whipped cream until smooth.
- Spoon the mixture into cups and chill for at least 2 hours.
- Topping Ideas: Shaved chocolate, a dollop of whipped cream, or fresh berries.
Layered Cake Cups: A Perfect Choice
If you’re a fan of layered desserts, cake cups are a must-try! They combine moist cake pieces, creamy frosting, and creative toppings for an easy yet impressive treat. Whether it’s for breakfast, brunch, or dessert, these cups bring a delightful twist to any occasion. For more inspiration on how to layer like a pro, check out Cake Cups: Perfect Layered Breakfasts for Every Occasion.
Strawberry Shortcake Cups
Light, fruity, and oh-so-pretty, these cups are a hit during spring and summer.
- Ingredients You’ll Need: Pound cake, fresh strawberries, whipped cream, and sugar.
- How to Make It:
- Dice the strawberries and toss them with a little sugar to create a natural syrup.
- Cut the pound cake into small cubes.
- Layer the cups with cake cubes, whipped cream, and strawberries. Repeat until full.
- Pro Tip: Garnish with a fresh mint leaf for that final touch of elegance.
No-Bake Cheesecake Cups

For cheesecake lovers who don’t want to turn on the oven, this recipe is a lifesaver.
- Ingredients You’ll Need: Cream cheese, powdered sugar, graham crackers, butter, and your favorite jam.
- How to Make It:
- Crush the graham crackers and mix them with melted butter to form the crust. Press this mixture into the bottom of each cup.
- Beat the cream cheese and powdered sugar until smooth.
- Pipe or spoon the cream cheese mixture over the crust layer.
- Top with a dollop of jam or fresh fruit. Chill before serving.
- Flavor Twist: Use lemon curd or caramel instead of jam for a new flavor profile.
Tiramisu Cups
A single-serve twist on the Italian favorite, these tiramisu cups are elegant and delicious.
- Ingredients You’ll Need: Ladyfingers, espresso, mascarpone cheese, sugar, cocoa powder, and heavy cream.
- How to Make It:
- Dip ladyfingers in espresso and layer them at the bottom of the cup.
- Mix mascarpone cheese with whipped cream and sugar until light and fluffy.
- Alternate layers of the mascarpone mixture and soaked ladyfingers.
- Dust the top with cocoa powder and chill overnight for the best flavor.
- Pro Tip: Add a splash of coffee liqueur for an extra kick.
Customization Ideas for Dessert Cups
Add a Seasonal Twist
One of the coolest things about dessert cups is how easy they are to adapt to the seasons. Here are some fun ideas to keep your treats in sync with the calendar:
- Fall: Use pumpkin puree, cinnamon, and crushed gingerbread cookies for a pumpkin pie-inspired dessert cup. Add a dollop of whipped cream and a sprinkle of nutmeg for that cozy fall vibe.
- Winter: Try peppermint chocolate mousse cups by mixing crushed candy canes into your whipped cream and topping them with a mini candy cane.
- Spring: Fresh berries are a must! Layer strawberries, raspberries, or even kiwi with a light vanilla cream for a fresh and fruity treat.
- Summer: Make peach cobbler cups by layering diced peaches, crushed shortbread cookies, and whipped cream.
Make Them Diet-Friendly
Whether you’re catering to specific dietary needs or just looking to make a lighter dessert, there are plenty of ways to adjust your recipes:
- Low-Sugar Options: Swap sugar with stevia, monk fruit sweetener, or agave syrup for a guilt-free treat.
- Dairy-Free: Use coconut cream instead of whipped cream, and opt for almond milk-based pudding.
- Gluten-Free: Replace cookie crumbs with gluten-free alternatives, like almond flour cookies or crushed rice cakes.
- Keto-Friendly: Stick to sugar-free chocolate, cream cheese, and almond flour crusts to keep your dessert cups low-carb.
Decorate Like a Pro
Let’s be honest—presentation is half the fun. Here are some easy ways to make your dessert cups look as amazing as they taste:
- Sprinkles Galore: Whether it’s rainbow sprinkles, edible glitter, or chocolate curls, a little sparkle goes a long way.
- Drizzles and Sauces: A quick drizzle of caramel, chocolate, or berry sauce on top takes your dessert to the next level.
- Fresh Toppings: Add a few fresh mint leaves, a slice of fruit, or a whole berry to give each cup a polished look.
- Crunchy Extras: Crushed nuts, cookie crumbs, or granola add great texture and visual appeal.
Get Creative with Layers
Layers are the secret to a stunning dessert cup. Mix and match textures and colors for a mouthwatering masterpiece. Here are some ideas:
- Combine creamy layers (like pudding or whipped cream) with crunchy elements (like cookies or nuts).
- Alternate vibrant layers, like chocolate and strawberries, to create eye-catching contrast.
- Add a surprise layer—like caramel, jam, or ganache—hidden in the middle to keep things exciting.
How to Store and Serve Dessert Cups
Storing Dessert Cups the Right Way
The key to perfect dessert cups is keeping them fresh and delicious until it’s time to serve. Follow these tips to ensure your sweet creations stay on point:
- Refrigeration is Essential: Most dessert cups, especially those with cream or fruit, should be stored in the fridge. Cover them with plastic wrap or lids to prevent them from drying out or absorbing other fridge smells.
- Shelf Life: Dessert cups typically last 2-3 days in the fridge, depending on the ingredients. For example:
- Fruit-based cups should be consumed within 1-2 days, as the fruit can release moisture.
- Cheesecake or mousse cups stay fresh longer, up to 3 days.
- Freezing Tips: Some dessert cups, like no-bake cheesecakes or mousse, can be frozen for up to a month. Store them in an airtight container, and thaw in the fridge overnight before serving.
How to Serve Like a Pro
Presentation matters, and dessert cups are all about looking as good as they taste. Here are a few tricks to serve them in style:
- Add Last-Minute Toppings: If your recipe calls for whipped cream, fresh fruit, or crunchy toppings, add these just before serving to keep them fresh and vibrant.
- Use a Tiered Dessert Stand: Display your dessert cups on a tiered stand to make them the centerpiece of the table. It’s a simple way to impress your guests without any extra effort.
- Provide Spoons or Forks: Set out mini spoons or forks next to the cups so guests can dig in easily. Bonus points for fancy-looking utensils—they add a touch of class.
- Keep Them Chilled: If you’re serving outdoors or at a party, place the dessert cups on a tray over ice to keep them cool and fresh for longer.
Transporting Dessert Cups
Bringing dessert cups to a party or event? Here’s how to get them there in one piece:
- Use a Cupcake Carrier: If you’re making mini dessert cups, a cupcake carrier with dividers works perfectly to keep them upright and secure.
- Place Them in a Sturdy Box: Line the bottom of a box with a towel or non-slip mat, and arrange the cups snugly so they don’t tip over during the trip.
- Keep Them Chilled: Use a cooler with ice packs to keep your dessert cups cold if you’re traveling a longer distance.
Wrapping It Up
Why Dessert Cups Are the Perfect Treat
Dessert cups check all the boxes: they’re cute, practical, and endlessly customizable. Whether you’re hosting a party, whipping up a midweek treat, or looking for a make-ahead dessert, these little cups of joy are a no-fail option. From creamy chocolate mousse to fresh fruit parfaits, there’s something to satisfy every sweet tooth.
What makes them even better? They’re easy to assemble, look stunning with minimal effort, and are the perfect portion size for indulging without overdoing it. Plus, let’s not forget the convenience of zero slicing, dicing, or serving chaos. Honestly, what’s not to love?
Your Turn to Try Dessert Cups
So, are you ready to bring a little sweetness into your kitchen? Whether you start with a classic like chocolate mousse or get creative with seasonal flavors, dessert cups are guaranteed to impress. They’re perfect for sharing (or keeping all to yourself—no judgment here!).
If you give any of these recipes a try, I’d love to hear how they turned out! Drop a comment below with your favorite flavor combo or your own unique spin. Better yet, snap a pic of your dessert cups and tag me on social media—I can’t wait to see your creations!
FAQ: All About Dessert Cups
Can I Make Dessert Cups Ahead of Time?
Absolutely! In fact, dessert cups are a perfect make-ahead dessert. Here’s how to plan it out:
Cream-Based Desserts: Mousse, cheesecake, or pudding cups can be made 1-2 days in advance. Keep them refrigerated until serving.
Fruit-Based Desserts: Assemble the base layers ahead of time, but add fresh fruit and toppings just before serving to keep them vibrant and fresh.
Freezable Options: Some recipes, like no-bake cheesecake cups, can be frozen for up to a month. Just thaw them in the fridge overnight before serving.
What’s the Best Way to Transport Dessert Cups?
Taking dessert cups to an event? No problem!
Use Divided Carriers: Cupcake carriers or boxes with dividers work wonders for keeping cups upright.
Snug Arrangement: Place them in a sturdy box with towels or bubble wrap to prevent movement during travel.
Chill On the Go: Use a cooler with ice packs to keep them cool, especially if you’re traveling in warm weather.
What Ingredients Can I Substitute for Dietary Needs?
You can easily adjust dessert cup recipes to suit specific dietary preferences.
Dairy-Free Options: Swap heavy cream with coconut cream or use almond milk-based puddings.
Sugar-Free Alternatives: Use sugar substitutes like stevia or monk fruit for a low-sugar version.
Gluten-Free Substitutes: Replace cookie crumbs with gluten-free alternatives or crushed nuts.
How Do I Keep Layers Neat and Tidy?
Use a Piping Bag: This works wonders for cream and pudding layers, keeping things clean and even.
Spoon Carefully: Use the back of a spoon to gently spread each layer before adding the next.
Chill Between Layers: Let each layer set in the fridge for 10-15 minutes before adding the next one to prevent smudging.
Can I Adjust Recipes for Larger Crowds?
Yes, dessert cups are easy to scale up for a big crowd.
Double or Triple the Recipe: Most dessert cup recipes can be multiplied without any issues. Just make sure you have enough cups and ingredients.
Use Assembly Lines: Set up your ingredients in an assembly line to layer cups quickly and efficiently.
Mini Portions: For larger parties, consider making smaller, bite-sized cups so everyone can try more than one flavor.
Conclusion: Sweet Success in Every Cup
Dessert cups are the ultimate treat—easy to make, endlessly customizable, and perfect for any occasion. From chocolate mousse to fruity parfaits, they’re guaranteed to impress without requiring hours in the kitchen. With simple ingredients and a creative touch, you can create desserts that look stunning and taste amazing. So, grab your cups and get started! Don’t forget to share your creations—I can’t wait to see what you whip up. Happiness in a cup, one spoonful at a time!