

You know those desserts that just hit differently? That’s exactly what these Black Forest Cupcakes do. They have everything—moist chocolate cake, a juicy cherry filling, fluffy whipped cream, and a rich chocolate garnish. Basically, they’re like the classic Black Forest Cake, but in individual servings that are easier to make and even more fun to eat.
The best part? They’re simple to put together with no complicated layers or tricky decorating. Just rich chocolate cupcakes filled with a sweet-tart cherry center, topped with a cloud of whipped cream. Whether you’re baking for a party, a birthday, or just because you want something indulgent, these cupcakes are guaranteed to be a hit.
Table of Contents
Why You’ll Love These Black Forest Cupcakes
If you love the combination of chocolate and cherries, these Black Forest Cupcakes will be your new favorite dessert. They bring together the best flavors of the classic cake in an easy, personal-sized treat.
1. Rich, Moist Chocolate Cupcakes
The base of these cupcakes is a soft and fudgy chocolate cake made with real cocoa powder for a deep, rich flavor. Each bite is perfectly balanced between sweet and slightly bitter chocolate notes.A base of rich cocoa powder and buttermilk creates a moist texture, much like a Triple Chocolate Cake.
2. Sweet and Juicy Cherry Filling
A good Black Forest dessert isn’t complete without cherries. These cupcakes are cored and filled with a delicious cherry filling that adds a burst of fruity sweetness. You can use store-bought cherry pie filling or make a homemade cherry compote for extra freshness.Sweet and tart cherries cooked down into a luscious filling, similar to the fruit layers in Delicious Dessert Cup Recipes.
3. Light and Fluffy Whipped Cream Topping
Instead of a heavy frosting, these cupcakes are topped with homemade whipped cream, just like a traditional Black Forest cake. It’s light, airy, and perfectly complements the rich chocolate and cherry flavors.
4. Easy to Make, Fun to Eat
Black Forest cake is known for its multiple layers, but these cupcakes keep things simple and stress-free. No slicing or fancy decorating needed—just bake, fill, and top with whipped cream and chocolate shavings.
5. Perfect for Any Occasion
Whether you’re making them for a birthday, holiday, or just because, these cupcakes are always a hit. They look elegant, taste incredible, and are easy to serve.
Ingredients You’ll Need for Black Forest Cupcakes
These Black Forest Cupcakes come together with simple ingredients that create rich flavors and the perfect texture. Here’s everything you’ll need.
1. Chocolate Cupcake Ingredients
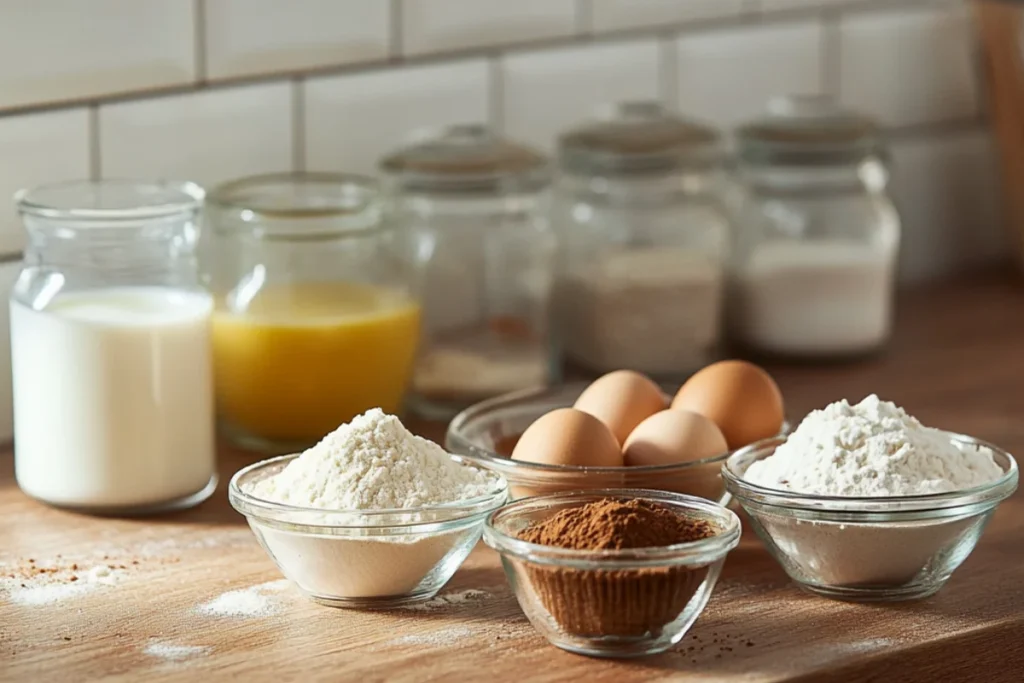
A moist and rich chocolate base is key to making these cupcakes taste just like a classic Black Forest cake.
- All-purpose flour – Gives structure to the cupcakes.
- Cocoa powder – Use Dutch-processed cocoa for a deeper chocolate flavor.
- Baking powder & baking soda – Helps the cupcakes rise and stay light.
- Granulated sugar – Adds the right amount of sweetness.
- Eggs – Provides moisture and helps with structure.
- Milk – Keeps the cupcakes soft and moist.
- Butter or oil – Butter gives more flavor, while oil makes the cupcakes extra moist.
- Vanilla extract – Enhances the overall flavor.
2. Cherry Filling Ingredients
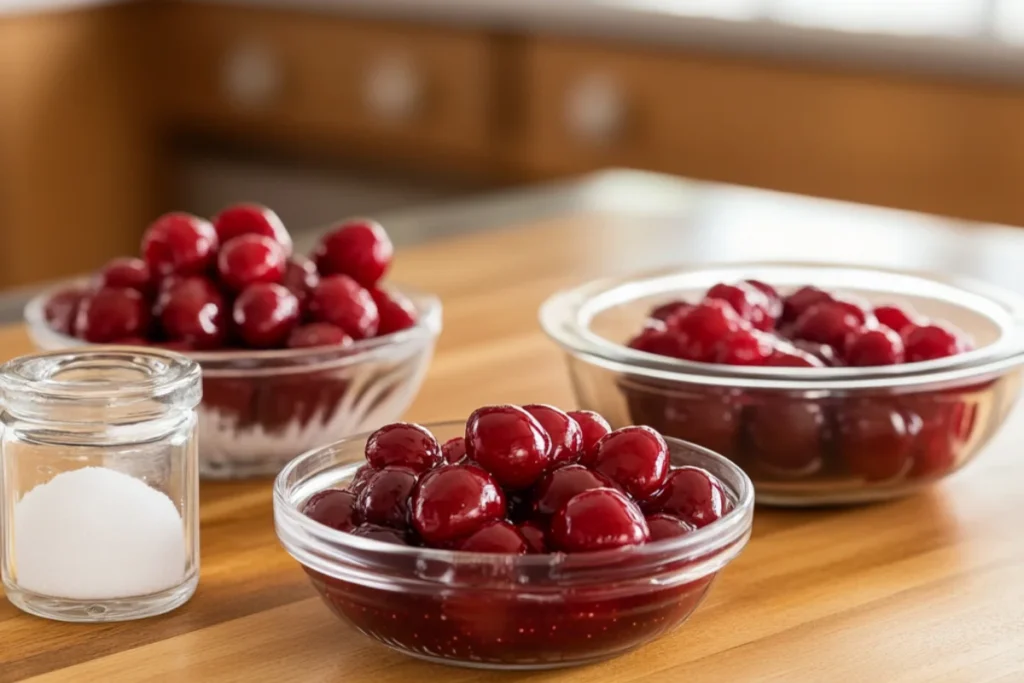
A juicy cherry filling adds that signature Black Forest flavor in every bite.
- Cherry pie filling – A quick and easy option.
- Fresh or frozen cherries – If you prefer a homemade filling, cook these down with sugar.
- Kirsch (optional) – A cherry liqueur traditionally used in Black Forest cake for an extra layer of flavor.
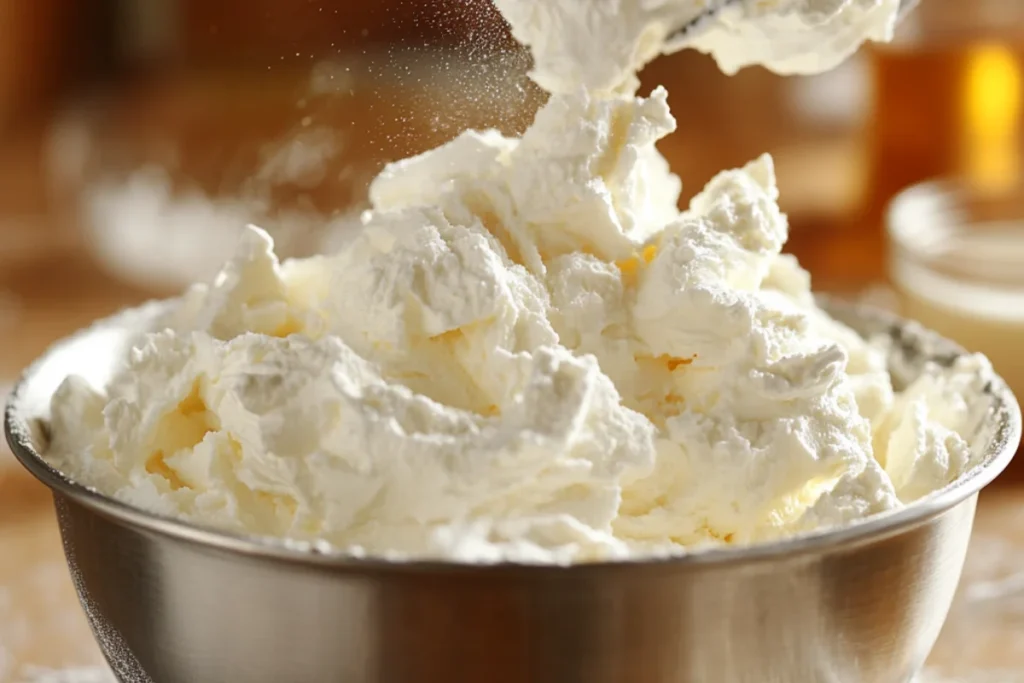
3. Whipped Cream Topping Ingredients
Instead of a heavy buttercream, this light whipped topping balances the richness of the chocolate and cherries.
- Heavy whipping cream – The base for fluffy, airy topping.
- Powdered sugar – Adds sweetness without being grainy.
- Vanilla extract – Brings out the flavors.
4. Garnish & Toppings
A Black Forest dessert isn’t complete without a beautiful garnish.
- Chocolate shavings – Use a chocolate bar and a vegetable peeler for delicate curls.
- Fresh cherries or maraschino cherries – The classic finishing touch on top.
How to Make Black Forest Cupcakes (Step-by-Step Guide)
These Black Forest Cupcakes are easy to make with just a few simple steps. From baking the perfect chocolate cupcake to filling them with cherries and topping them with whipped cream, here’s how to do it.
1. Bake the Chocolate Cupcakes

- Preheat your oven to 350°F (175°C) and line a cupcake tin with liners.
- In a bowl, whisk together flour, cocoa powder, baking soda, and baking powder.
- In a separate bowl, beat butter (or oil) and sugar until light and fluffy. Add eggs and vanilla extract and mix well.
- Alternate adding dry ingredients and milk, mixing until just combined.
- Divide the batter evenly into the cupcake liners, filling each about ⅔ full.
- Bake for 18–20 minutes, or until a toothpick inserted in the center comes out clean.
- Let the cupcakes cool completely before adding the filling.
2. Prepare the Cherry Filling
- If using cherry pie filling, it’s ready to go!
- If making homemade filling, heat fresh or frozen cherries with sugar in a saucepan over medium heat until soft.
- Optionally, stir in a splash of Kirsch (cherry liqueur) for an authentic Black Forest flavor.
- Let the filling cool before using.
3. Core and Fill the Cupcakes
- Once the cupcakes are cool, use a small knife or cupcake corer to remove the center of each cupcake.
- Spoon about a teaspoon of cherry filling into the hole.
- Place the removed cupcake piece back on top (optional, but helps hold the filling).
4. Make the Whipped Cream Topping
- In a chilled mixing bowl, beat heavy cream, powdered sugar, and vanilla until stiff peaks form.
- Be careful not to overwhip, or it will turn into butter.
5. Decorate and Serve
- Pipe or spoon the whipped cream on top of each cupcake.
- Sprinkle with chocolate shavings for extra richness.
- Finish with a fresh cherry or maraschino cherry on top.
- Serve immediately or store in the fridge until ready to eat.
Tips & Variations for the Best Black Forest Cupcakes
Want to take your Black Forest Cupcakes to the next level? Here are some tips to make them even better and a few fun variations to try.
1. Pro Tips for Perfect Cupcakes
Use High-Quality Cocoa for the Best Flavor
- Dutch-processed cocoa will give your cupcakes a deeper, richer chocolate flavor. If using natural cocoa powder, your cupcakes may be slightly more acidic and less intense in flavor.
Don’t Overmix the Batter
- Stir just until the ingredients are combined. Overmixing can lead to dense or dry cupcakes.
Chill the Whipping Cream Before Beating
- For the fluffiest whipped cream, chill your mixing bowl and beaters in the freezer for about 10 minutes before whipping.
Make the Cupcakes Ahead of Time
- Bake the cupcakes a day ahead and store them in an airtight container. Fill and frost them right before serving for the freshest taste.
2. Fun Variations of Black Forest Cupcakes
Boozy Black Forest Cupcakes
- For an authentic Black Forest flavor, add a splash of Kirsch to the cherry filling or brush Kirsch syrup over the cupcakes before filling them.
Double Chocolate Black Forest Cupcakes
- Stir chocolate chips into the batter for extra chocolate richness.
Gluten-Free Black Forest Cupcakes
- Use gluten-free flour to make these cupcakes suitable for those with gluten sensitivities.
Vegan Black Forest Cupcakes
- Swap eggs for flax eggs, use dairy-free milk, and replace whipped cream with coconut whipped cream for a vegan-friendly version.
White Chocolate Black Forest Cupcakes
- Replace the cocoa in the cupcake batter with melted white chocolate for a different take on this classic dessert.
Serving and Storing Black Forest Cupcakes
Once your Black Forest Cupcakes are topped with whipped cream and garnished with chocolate shavings, they’re ready to serve. Here’s how to make sure they stay fresh and delicious.
1. Best Ways to Serve Black Forest Cupcakes
Chilled for the Best Flavor
- Since these cupcakes have whipped cream topping, they are best served slightly chilled.
- Let them sit at room temperature for 5–10 minutes before serving to soften slightly.
Perfect for Special Occasions
- These cupcakes are a hit for birthdays, holidays, Valentine’s Day, or any celebration.
- For an extra special touch, dust them with powdered sugar or cocoa powder before serving.
2. How to Store Black Forest Cupcakes
Refrigerating the Cupcakes
- Because of the whipped cream, store cupcakes in an airtight container in the refrigerator for up to 3 days.
- If storing for longer, it’s best to add the whipped cream fresh before serving.
Freezing Black Forest Cupcakes
- You can freeze the cupcakes without whipped cream for up to 2 months.
- To freeze, place cooled cupcakes in an airtight container or wrap them individually in plastic wrap.
- Thaw overnight in the refrigerator, then add the cherry filling and whipped cream fresh before serving.
3. Can You Make Black Forest Cupcakes in Advance?
Yes! Here’s how to prepare them ahead of time:
- Cupcakes – Bake and store in an airtight container at room temperature for 1–2 days.
- Cherry Filling – Make the filling and refrigerate for up to 5 days.
- Whipped Cream – Whip it fresh before serving for the best texture.
Frequently Asked Questions About Black Forest Cupcakes
What is special about Black Forest cake?
Black Forest cake is special because of its rich layers of chocolate cake, sweet cherry filling, and fluffy whipped cream topping. The combination of flavors and textures creates a perfectly balanced dessert that is both indulgent and refreshing. Traditionally, it includes Kirsch, a cherry liqueur, which enhances the cherry flavor and gives the cake an authentic German touch.
What is the difference between normal cake and Black Forest cake?
A normal chocolate cake is typically a simple sponge or butter-based cake with frosting, whereas Black Forest cake has distinct layers of chocolate cake, cherry filling, whipped cream, and chocolate shavings. It’s also known for its Kirsch-soaked layers, which add depth and a hint of cherry liqueur flavor.
What is the flavor of the Black Forest gâteau?
The Black Forest gâteau has a rich chocolate flavor, sweet-tart cherry, and light, airy whipped cream. The chocolate cake provides a deep cocoa taste, while the cherries add a fruity contrast. If Kirsch is included, it adds a mild, slightly boozy cherry essence. The whipped cream balances the richness with its light, creamy texture.
What is the difference between Black Forest cake and Devil’s Food cake?
- Black Forest cake is a layered dessert with chocolate, cherry filling, whipped cream, and chocolate shavings.
- Devil’s Food is a super-rich, deep chocolate cake with more cocoa and butter for a moist, fudgy texture. It is usually frosted with chocolate buttercream instead of whipped cream and does not contain cherries.
What is in the middle of Black Forest cake?
The middle layers of Black Forest cake contain cherry filling and whipped cream. The chocolate cake layers are typically brushed with Kirsch syrup (or cherry juice) to keep them moist and add more flavor.
Why is it called angel food cake?
Angel food cake gets its name because of its light, airy, and fluffy texture, which is said to be so delicate that it’s “fit for angels.” It’s made with egg whites, sugar, and flour, without butter or oil, giving it a soft, cloud-like consistency.
Final Thoughts on Black Forest Cupcakes
If you love chocolate, cherries, and whipped cream, these Black Forest Cupcakes are a must-try. They bring all the flavors of the classic German cake into a simple, easy-to-serve dessert. Each bite is a perfect balance of rich chocolate, sweet cherry filling, and airy whipped cream, making them a crowd favorite for any occasion.
Why You’ll Love This Recipe
- Easy to make – No complicated layers, just bake, fill, and top.
- Classic flavors – The perfect mix of chocolate and cherries with a light whipped topping.
- Great for any occasion – Perfect for birthdays, holidays, or a sweet treat.
- Customizable – Try variations like boozy Kirsch cupcakes, extra chocolate, or a gluten-free version.
Let’s Hear From You!
Have you tried making Black Forest Cupcakes? Do you have a favorite twist on this recipe? Leave a comment below and share your thoughts! If you loved this recipe, don’t forget to save it, share it, or tag me on social media—I’d love to see your creations.
Now, grab your ingredients and start baking. These cupcakes won’t last long once they’re out of the oven!