

Introduction:
Let’s be honest—Valentine’s Day is all about the sweets. Whether you’re celebrating with a special someone, your besties, or just treating yourself (because why not?), nothing says love like homemade desserts. And if you’re looking for something fun, easy, and adorable, these Valentine’s Day cake pops are the way to go.
They’re bite-sized, chocolate-coated, and can be decorated with all the festive sprinkles, drizzles, and heart-shaped toppings you can imagine. Plus, they make the perfect gift—pop a few in a cute box, wrap them with a ribbon, and boom, you’ve got a homemade Valentine’s treat that beats store-bought candy any day.
Even if you’ve never made cake pops before, don’t worry! I’ve got all the tips, tricks, and step-by-step instructions to ensure they turn out delicious, gorgeous, and Instagram-worthy. So grab your cake mix, melt some chocolate, and let’s start!
Why Cake Pops Are Perfect for Valentine’s Day
Regarding Valentine’s Day treats, you want something cute, delicious, and easy to share. That’s where cake pops come in! These little bites of cake and frosting, coated in chocolate and decorated with love, are the ultimate festive dessert. Whether you’re making them for a romantic date, a Galentine’s party, or as a fun baking project with kids, they’re a guaranteed hit.
1. They’re Easy to Make and Customize
You don’t need to be a pro baker to whip up a batch of cake pops. With just a few simple ingredients—cake, frosting, and chocolate—you can create something that looks fancy but is super simple. Plus, you can get creative with flavors, colors, and decorations to make them match your Valentine’s vibe.
2. They’re Perfect for Gifting
Forget the store-bought chocolates—homemade treats always feel more special. Wrap your cake pops in cute bags with ribbons or arrange them in a bouquet for a unique and thoughtful gift. They’re small, portable, and won’t melt like traditional chocolates, making them easy to share with friends, coworkers, or someone special.
3. Fun for All Ages
Whether you’re making them with kids or for a party, cake pops are a fun and interactive treat. Kids love rolling the cake balls, dipping them in chocolate, and adding sprinkles. And let’s be honest—adults love them just as much!
4. Mess-Free and Easy to Eat
Unlike cupcakes or slices of cake, cake pops are perfectly portioned and don’t require forks or plates. Just grab one and enjoy! They’re great for Valentine’s Day parties, lunchbox treats, or a sweet snack.
Ready to make your own? Let’s go over everything you’ll need to get started!
Ingredients You Need for Valentine’s Day Cake Pops
Before we jump into the fun part (decorating!), let’s ensure you have everything ready. The best part about cake pops is that they use simple ingredients you probably already have in your kitchen.
1. Basic Cake Pop Ingredients
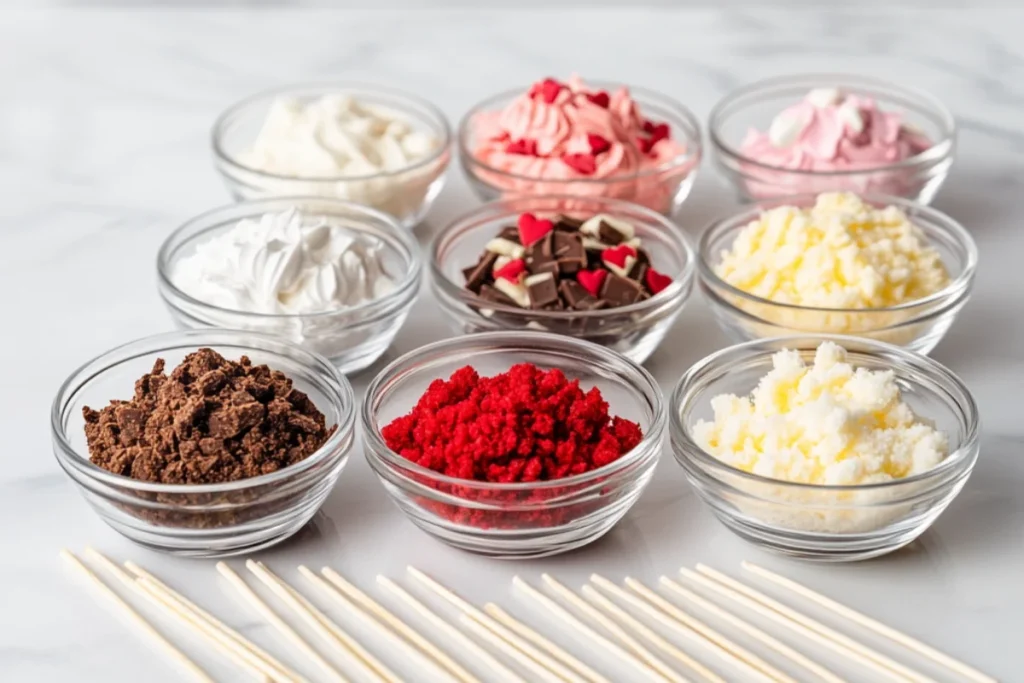
Here’s what you’ll need to make the cake base:
- Cake – You can use a homemade cake or a box mix. Vanilla, chocolate, red velvet or purple velvet cake , or strawberry work great for Valentine’s Day!
- Frosting – A few spoonfuls of frosting help bind the cake crumbs together. Buttercream, cream cheese frosting, or even store-bought frosting will do the trick.
- Lollipop sticks – These help transform your cake balls into pops! You can find them at craft stores or online.
2. Chocolate Coating
The outer layer is what makes cake pops look smooth and professional. You’ll need:
- Candy melts or chocolate – Red, pink, white, or dark chocolate melts will give you a festive Valentine’s Day look.
- Coconut oil or shortening helps thin the melted chocolate for easy dipping.
3. Valentine’s Day Decorations
Now for the fun part! Get creative with:
- Sprinkles – Heart-shaped sprinkles, red and pink jimmies, or edible glitter.
- Drizzles – Melted white or pink chocolate drizzled over the top.
- Edible pearls or gold dust – For an extra fancy touch!
Once you’ve prepared all your ingredients, it’s time to start baking. Next, we’ll go through the step-by-step process of making these adorable cake pops!
Step-by-Step Guide to Making Valentine’s Day Cake Pops
Now that your ingredients are ready, it’s time to start baking! Cake pops may look fancy, but they’re simple to make. Follow these steps, and you’ll have the cutest, most delicious Valentine’s Day treats in no time.
1. Bake the Cake
- Start by baking your favorite cake. You can use a box mix or make one from scratch.
- Let the cake cool completely before moving on to the next step. A warm cake will be too soft to work with.
2. Crumble and Mix

- Once your cake is cooled, break it into small crumbs using your hands or a food processor.
- Add a few spoonfuls of frosting and mix until the cake crumbs stick together like dough. Be careful not to add too much frosting—just enough to hold everything together!
3. Roll Into Balls
- Scoop out small portions of the cake mixture and roll them into even-sized balls. Aim for about 1 inch in diameter.
- Place the cake balls on a baking sheet lined with parchment paper.
4. Chill the Cake Balls
- Refrigerate or freeze the cake balls for at least 20–30 minutes. This helps them firm up, making it easier to dip in chocolate later.
5. Insert the Sticks
- Melt a small amount of chocolate and dip the tip of each lollipop stick into it. Then, insert the stick halfway into each cake ball.
- Place them back in the fridge for 10 minutes to set.
6. Dip in Chocolate
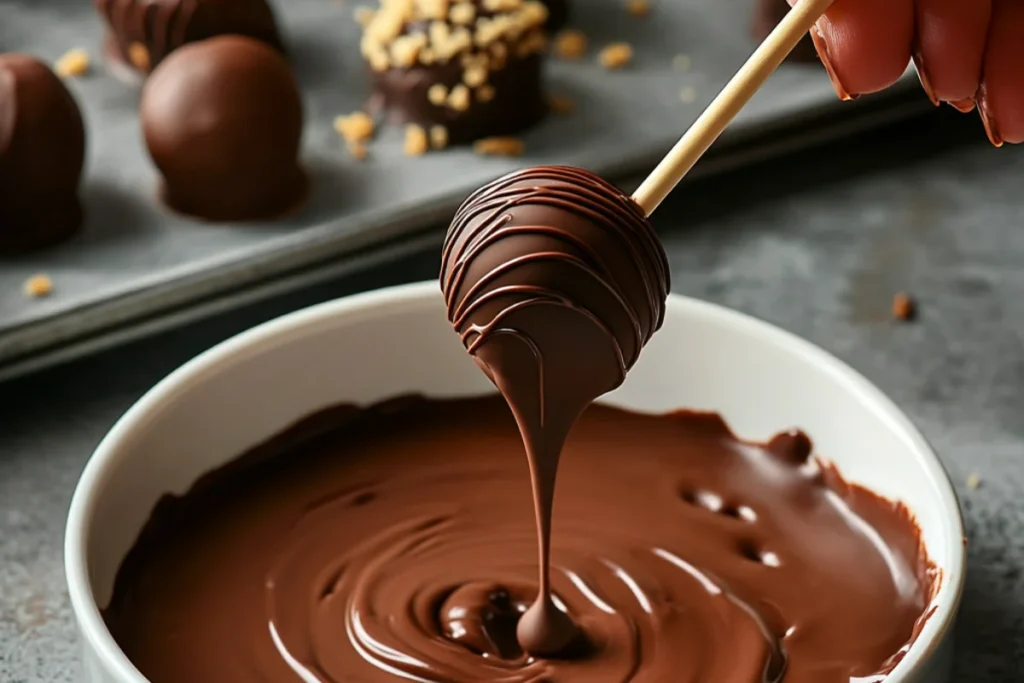
- Melt your candy melts or chocolate in a microwave-safe bowl, stirring until smooth. If needed, add a little coconut oil or shortening to thin it out.
- Dip each cake pop into the melted chocolate, gently tapping off any excess.
7. Decorate with Love
- Before the chocolate hardens, add your sprinkles, drizzles, or edible pearls.
- For a fun Valentine’s touch, drizzle white or pink chocolate over the cake pops for a fancy finish.
- If you enjoy layered desserts, these cake pops pair wonderfully with cake cups.
8. Let Them Set
- Stick the cake pops into a foam block or place them on parchment paper to dry completely.
- Once set, they’re ready to enjoy!
And just like that, you’ve got the perfect Valentine’s Day cake pops!
Pro Tips for Perfect Valentine’s Day Cake Pops
Making cake pops is easy, but a few small tricks can make a big difference in how they turn out. If you’ve ever had cake pops crack, fall off the stick, or look uneven, don’t worry—I’ve got you covered! Follow these tips to ensure your Valentine’s Day cake pops are flawless.
1. How to Prevent Cracking
- Cracks happen when the cake balls are too cold, and the melted chocolate is too hot. To avoid this, let the chilled cake balls sit at room temperature for a few minutes before dipping.
- Ensure your melted chocolate isn’t scorching hot—warm and smooth is the goal!
2. Keeping the Cake Pops from Falling Off the Stick
- Always dip the lollipop stick in melted chocolate before inserting it into the cake ball. This helps create a “glue” that holds the cake in place.
- If the cake pops feel loose after inserting the sticks, refrigerate them for 10 minutes before dipping them in chocolate.
3. Getting a Smooth Chocolate Coating
- Use a deep cup or bowl for dipping to submerge the cake pop in one smooth motion.
- Tap off excess chocolate by gently tapping your wrist instead of shaking the stick, which can loosen the cake ball.
- If the coating is too thick, add a little coconut oil or vegetable shortening to thin it out.
4. Decorating Like a Pro
- Add sprinkles immediately after dipping so they stick before the chocolate hardens.
- Use a spoon or piping bag to drizzle a contrasting chocolate color for a fancy finish.
- Dust cake pops with edible glitter or pearl dust once dry for extra shine.
5. Best Way to Store Cake Pops
- Short-term: If eating within a day or two, keep them in an airtight container at room temperature.
- Long-term: Store in the fridge for up to a week or freeze for up to a month. Just let them come to room temperature before serving so they don’t sweat.
Now that you’ve learned the secrets to perfect cake pops let’s explore some fun flavor variations!
Fun Variations to Try for Valentine’s Day Cake Pops
Classic vanilla or chocolate cake pops are always a hit, but why not switch things up for Valentine’s Day? Here are some delicious and creative flavor ideas to make your cake pops extra special.
1. Strawberry Shortcake Cake Pops
- Use strawberry cake as the base and mix it with vanilla frosting.
- Dip in white chocolate and drizzle with pink candy melts for a romantic look.
- Top with crushed freeze-dried strawberries for a burst of flavor.
2. Red Velvet with Cream Cheese Frosting
- A red velvet cake base mixed with cream cheese frosting gives a rich, tangy flavor.
- Dip in dark or white chocolate for a dramatic contrast.
- Sprinkle with red and white heart-shaped sprinkles for the perfect Valentine’s touch.
3. Chocolate-Covered Cherry Cake Pops
- Start with a chocolate cake base mixed with cherry-flavored frosting.
- Dip in milk or dark chocolate for that classic chocolate-covered cherry vibe.
- Garnish with a small maraschino cherry or red drizzle for a fancy look.
4. White Chocolate Raspberry Cake Pops
- Make a vanilla or raspberry cake and mix it with raspberry frosting.
- Coat in white chocolate and drizzle with pink or red candy melts.
- Add a sprinkle of edible glitter for a sophisticated touch.
5. Cookies and Cream Cake Pops
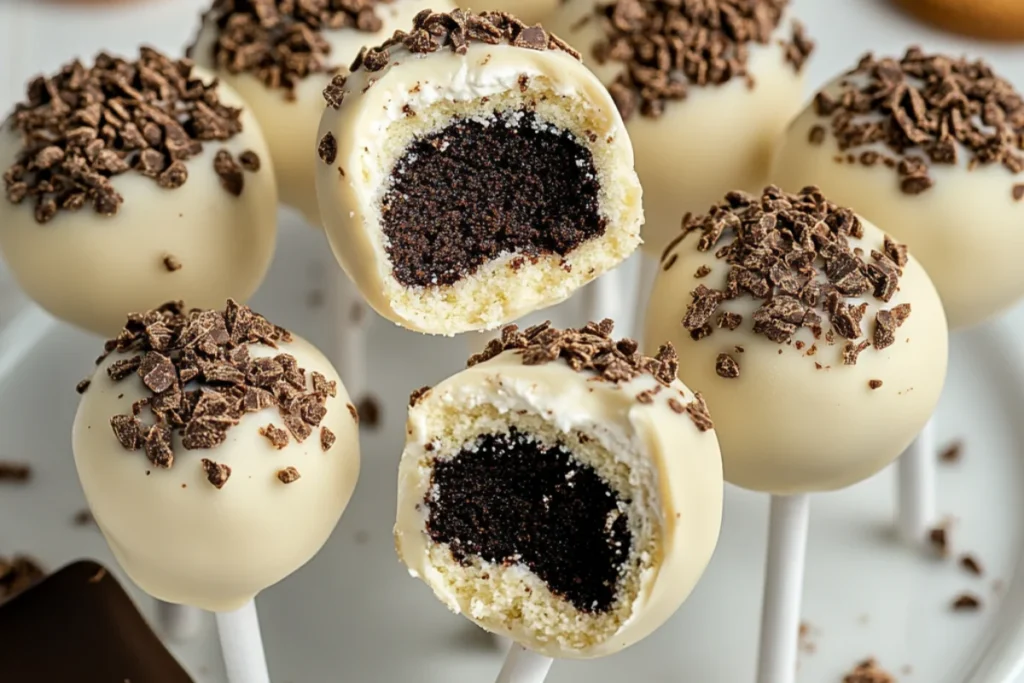
- Use chocolate cake mixed with crushed Oreos and vanilla frosting.
- Dip in white chocolate and sprinkle with crushed Oreos for a cookies-and-cream effect.
- Perfect for those who love a little crunch with their cake pops!
6. Vegan & Gluten-Free Options
- Use a gluten-free cake mix or a homemade vegan cake.
- Mix with dairy-free frosting and coat in vegan chocolate.
- Decorate with allergen-friendly sprinkles to keep them festive and safe for everyone to enjoy.
No matter which flavor you choose, these Valentine’s Day cake pops will be a total hit. Next up, let’s go over some creative ways to package them for gifting!
Cute Ways to Package & Gift Valentine’s Day Cake Pops
Valentine’s Day cake pops aren’t just fun to eat—they also make the perfect homemade gift! Whether you’re giving them to your sweetheart, friends, or coworkers, a little creative packaging can make them feel extra special. Here are some adorable ways to wrap up your cake pops for gifting.
1. Cake Pop Bouquet
- Arrange cake pops in a small vase or mason jar filled with decorative filler (like shredded paper or mini marshmallows).
- Tie a ribbon around the jar for a polished look.
- Add a cute tag with a handwritten note like “You make life sweeter!”
2. Individually Wrapped Cake Pops
- Wrap each cake pop in clear cellophane bags and tie with red, pink, or gold ribbon.
- Add a personalized gift tag or a tiny Valentine’s Day sticker.
- Perfect for classroom treats, party favors, or coworkers!
3. Cake Pop Gift Box
- Place a few cake pops inside a small bakery-style box with a clear window.
- Line the box with tissue paper or shredded paper filler for a cute presentation.
- Seal the box with a Valentine ‘s themed sticker or washi tape.
4. DIY Cake Pop Stand for Parties
- Display cake pops on a decorated foam block or a tiered dessert stand.
- Add small heart-shaped labels with fun messages like “Be Mine” or “Sweet Love.”
- Great for Valentine’s Day parties or dessert tables!
5. Cake Pops in a Mug
- Place a few wrapped cake pops inside a cute Valentine ’s-themed mug.
- Add a packet of hot cocoa or tea for a cozy gift idea.
- Wrap the whole mug in a clear bag and tie it with a ribbon.
6. Mini Cake Pop Gift Bags
- Arrange 3–5 cake pops in a small treat bag for a mini cake pop sampler.
- Use themed bags with hearts, polka dots, or love notes for extra flair.
- A great way to make a sweet little gift without much effort!
No matter how you package them, homemade cake pops show love and effort, making them the perfect Valentine’s Day gift. Now, let’s wrap things up with some final thoughts!
FAQs About Valentine’s Day Cake Pops
1. What is the trick to cake pops?
The key to perfect cake pops is getting the right consistency. The cake and frosting mixture should be moist enough to hold its shape but not too wet. Chilling the cake balls before dipping helps them stay firm and prevents them from falling off the stick. Also, always dip the stick in melted chocolate before inserting it into the cake ball—this helps it stay secure!
2. What’s in the Valentine’s cake pop?
A classic Valentine’s Day cake pop is made of crumbled cake mixed with frosting, shaped into a ball, and dipped in melted chocolate or candy coating. Popular flavors for Valentine’s cake pops include red velvet with cream cheese frosting, strawberry with white chocolate, and classic chocolate with pink or red decorations. They’re then topped with sprinkles and heart-shaped candies or drizzled with contrasting chocolate for a festive touch.
3. What can I use instead of sticks for cake pops?
If you don’t have lollipop sticks, you can use:
- Pretzel sticks – A crunchy, edible option!
- Paper straws – A colorful and eco-friendly alternative.
- Toothpicks – Great for mini cake pops.
- Plastic cocktail picks – Perfect for party displays.
Or, you can simply skip the sticks and serve them as cake balls!
4. What is the difference between cake pops and cake balls?
The main difference is the presentation. Cake balls are round cake bites coated in chocolate, while cake pops are cake balls on a stick. Both taste the same, but cake pops are easier to hold and serve at parties, while cake balls are usually served in mini cupcake liners.
5. What not to do when making cake pops?
Here are common mistakes to avoid:
- Adding too much frosting makes the cake too soft and difficult to roll.
- Skipping the chilling step – Warm cake balls will fall apart in melted chocolate.
- Using overly hot chocolate – This can cause cracks in the coating.
- Do not dip the stick in the chocolate first. This helps secure the stick in place.
- Rushing the drying process – Set them at room temperature for a smooth finish.
6. Are cake pops more expensive than cupcakes?
Yes, cake pops are often more expensive than cupcakes because they require more steps—rolling, chilling, dipping, and decorating each one individually. They also use more chocolate or candy melts for coating. While cupcakes are baked and frosted quickly, cake pops take more time and effort, making them a premium treat in bakeries. But when homemade, they’re a fun and budget-friendly option!
Got more cake pop questions? Drop them in the comments—I’d love to help!
Final Thoughts on Valentine’s Day Cake Pops
Valentine’s Day cake pops are the perfect mix of fun, creativity, and sweetness. Whether you’re making them for a loved one, a group of friends, or to treat yourself, they’re guaranteed to bring smiles. Plus, they’re easier to make than they look, and with so many flavor and decoration options, you can customize them however you like.
1. Why You’ll Love These Cake Pops
- Easy to make – No complicated baking skills required!
- Thoroughly customizable – Pick your favorite cake, frosting, and decorations.
- Perfect for gifting – Cute, thoughtful, and better than store-bought treats.
- Great for parties – Mess-free and easy to serve!
2. Share the Love!
If you try these Valentine’s Day cake pops, I’d love to see how they turn out! Snap a photo and share it on social media, tagging me so I can see your creations.
3. Try More Sweet Valentine’s Day Recipes
Looking for more homemade Valentine’s treats? Here are a few ideas to try next:
- Heart-shaped sugar cookies with pink icing
- Strawberry cheesecake brownies
- Red velvet cupcakes with cream cheese frosting
No matter how you celebrate, these cake pops will add sweetness to your Valentine’s Day. So grab your ingredients, get creative, and spread the love—one bite at a time!
Happy baking and Happy Valentine’s Day!